一,前言
这是一个关于从电脑安装深度学习环境到实现YOLOv8目标检测在RK3588上部署的全过程。
本人配置:
1,一台笔记本
2,一个香橙派5s
二,深度学习环境配置
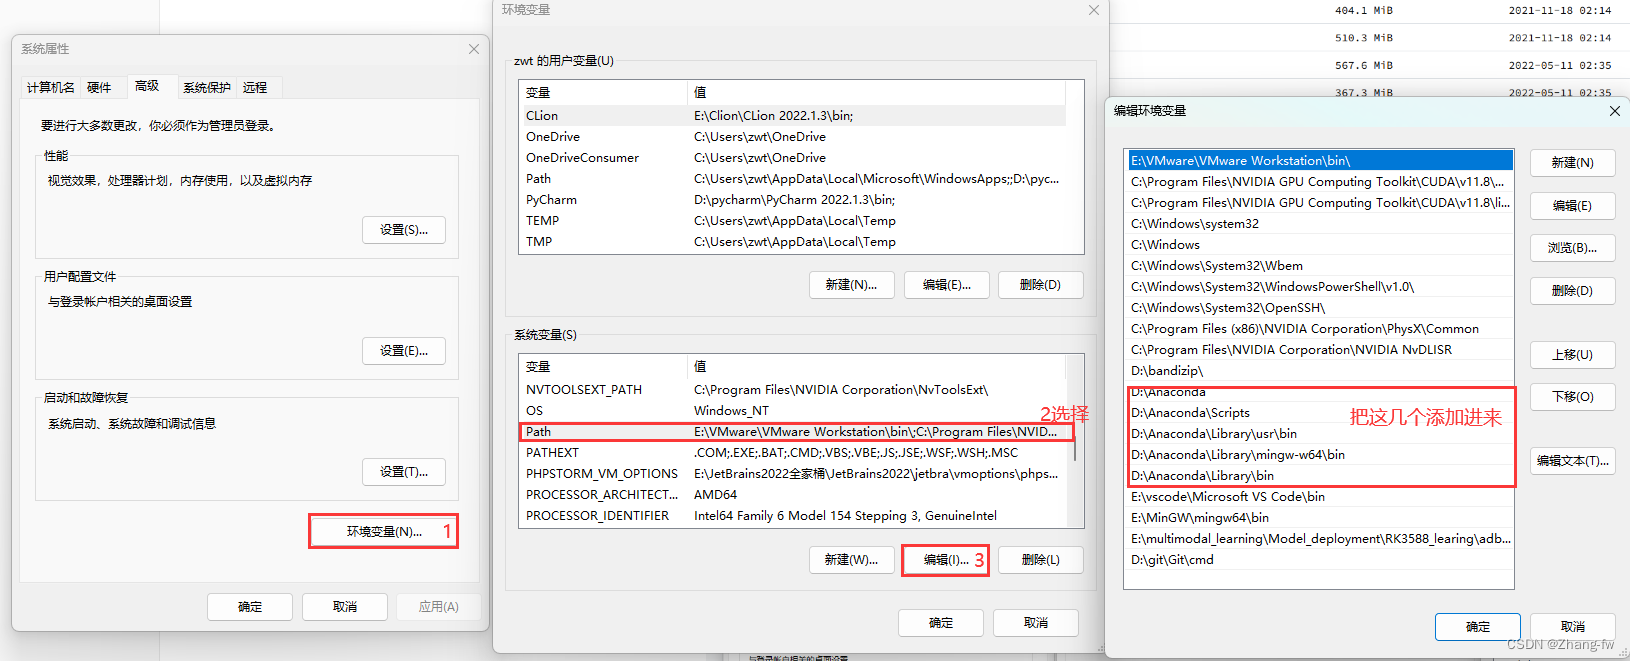
2.1 安装anaconda
使用清华镜像源下载https://mirrors.tuna.tsinghua.edu.cn/anaconda/archive/根据自己的电脑选择下载安装
安装之后把下面几个Anaconda的环境变量添加进系统变量中。
2.2 安装Pycharm
去Pycharm官网下载https://www.jetbrains.com/pycharm/download/,有专业版(收费)和社区版。

2.3 安装CUDA与cuDNN
参考https://blog.csdn.net/zyq880625/article/details/138086225
2.3.1安装CUDA
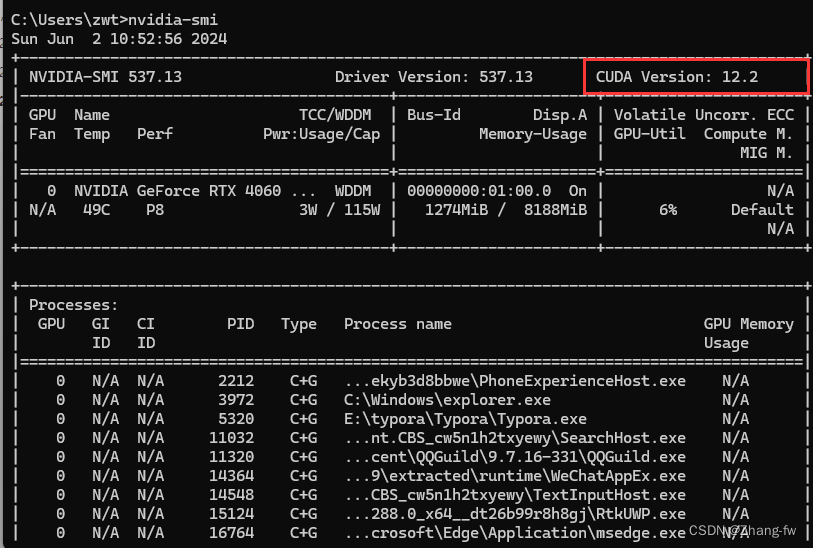
win+R打开cmd,输入nvidia-smi来查看自己可以安装的CUDA版本(不能超过12.2)。
nvidia-smi
CUDA下载地址CUDA Toolkit Archive | NVIDIA Developer,选择一个不高与自己CUDA的版本,然后进入选择自己电脑的配置最后下载安装。

安装过程
1、双击下载的EXE安装包,开始安装;
2、提取安装文件的(临时)存放位置,保持默认,点击OK,等待文件提取完成;
3、等待检查系统兼容性;
4、许可协议,点击同意并继续;
5、如果是第一次安装,选择精简(精简版本是下载好所有组件,并且会覆盖原有驱动),一直点击下一步即可,安装完成关闭即可;
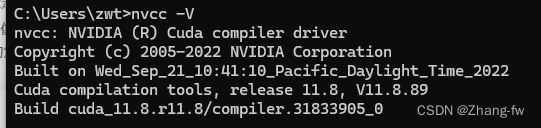
查看是否安装成功
在cmd中输入nvcc -V
nvcc -V
2.3.2 安装cuDNN
去cuDNN Archive | NVIDIA Developer选择与自己CUDA合适的版本下载,下载后将压缩包解压
将解压后的文件夹中的bin、include、lib 三个文件夹,移动到CUDA Development 安装路径下,
与同名文件夹合并。
CUDA Development 默认安装路径:
C:\Program Files\NVIDIA GPU Computing Toolkit\CUDA\v11.0
添加至系统变量:
往系统环境变量中的 path 添加如下路径(根据自己的路径进行修改)
C:\Program Files\NVIDIA GPU Computing Toolkit\CUDA\v11.0\bin
C:\Program Files\NVIDIA GPU Computing Toolkit\CUDA\v11.0\include
C:\Program Files\NVIDIA GPU Computing Toolkit\CUDA\v11.0\lib
C:\Program Files\NVIDIA GPU Computing Toolkit\CUDA\v11.0\libnvvp
2.4 安装GPU版本的Pytorch
打开 Anaconda prompt
使用 conda create -n 虚拟环境名字 虚拟环境的python版本 来创建虚拟环境
conda create -n pytorch python=3.9
创建完虚拟环境后,再激活虚拟环境,,左边括号表示现在所处的环境
conda activate pytorch

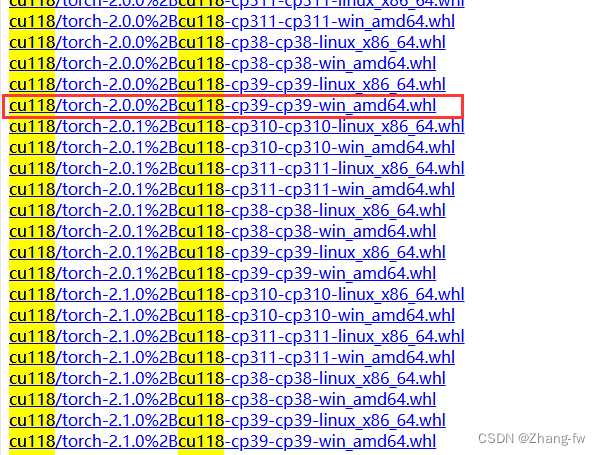
pytorch 的下载链接:download.pytorch.org/whl/torch_stable.html,torch,torchvision的对应关系如下
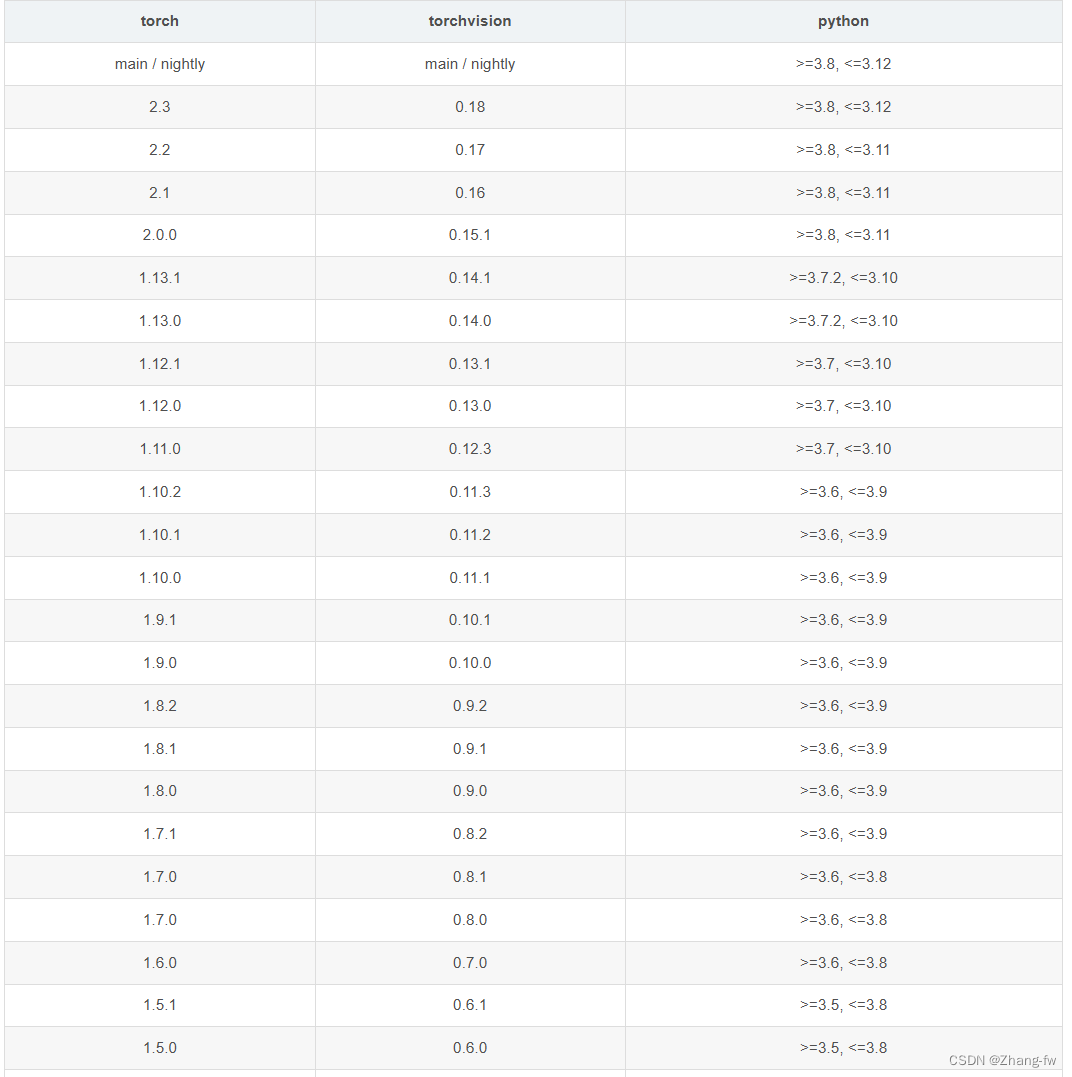
因为我创建的pytorch环境的python是3.9所以我选择的是torch=2.0.0,torchvision=0.15.1

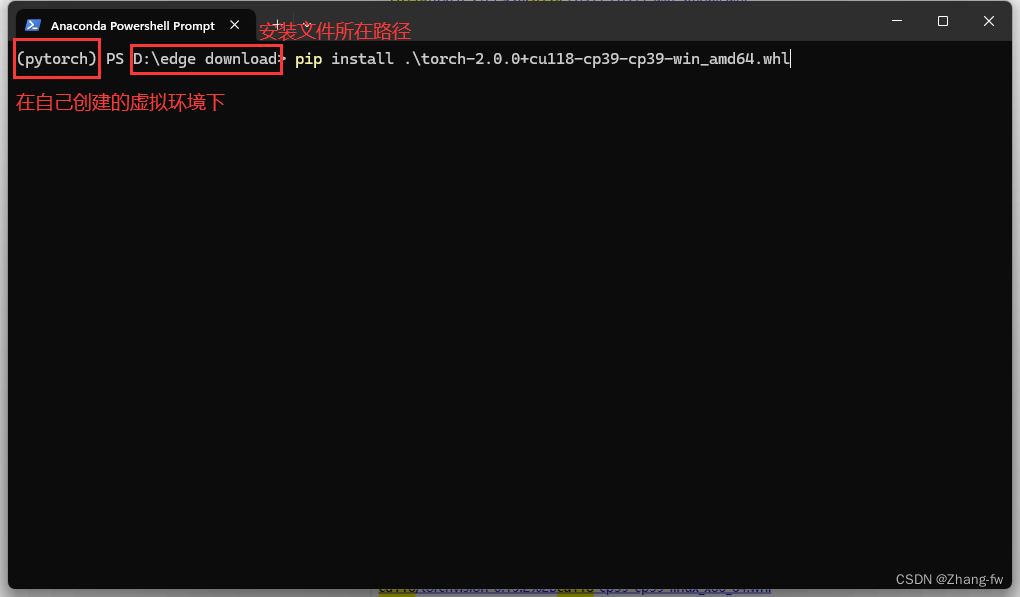
下载完成后在Anaconda prompt使用下面命令安装
pip install torch-2.0.0+cu118-cp39-cp39-win_amd64.whl
pip install torchvision-0.15.1+cu118-cp39-cp39-win_amd64.whl
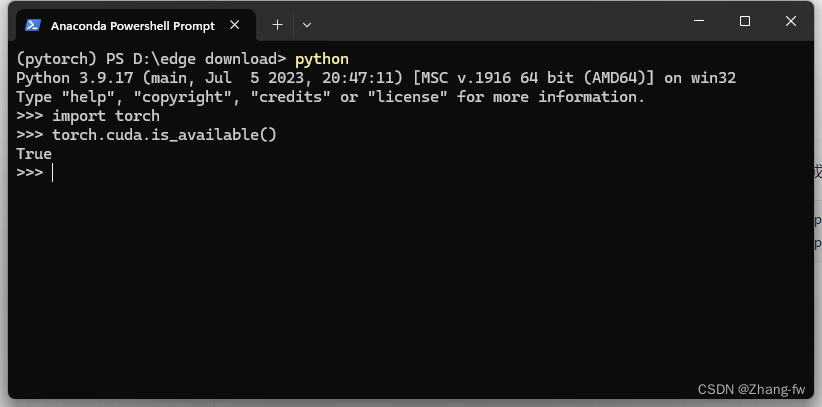
安装完成后在Anaconda prompt中打开python,使用下面命令查看是否可以使用GPU。
import torch
torch.cuda.is_available()
返回True则表示安装成功。
三,训练自己的模型
3.1 YOLO环境配置
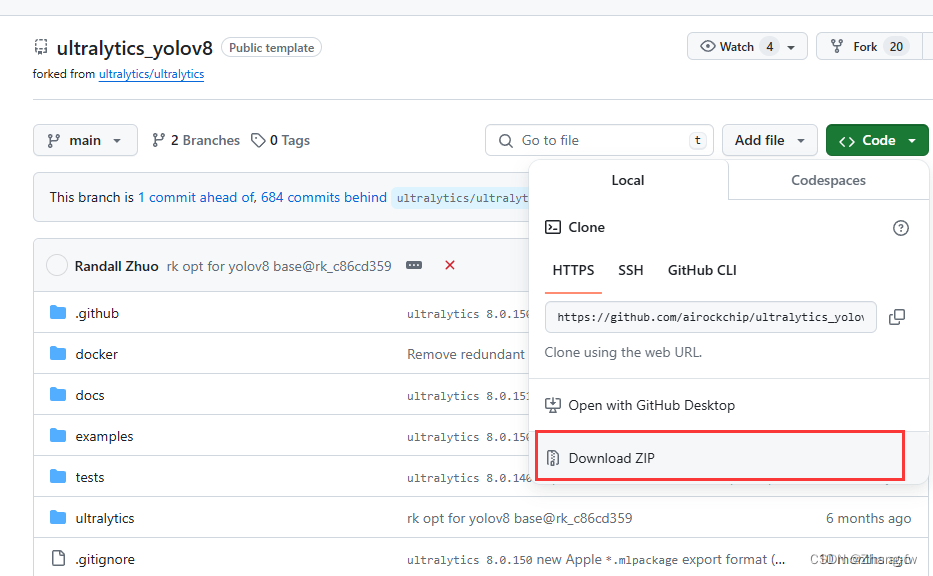
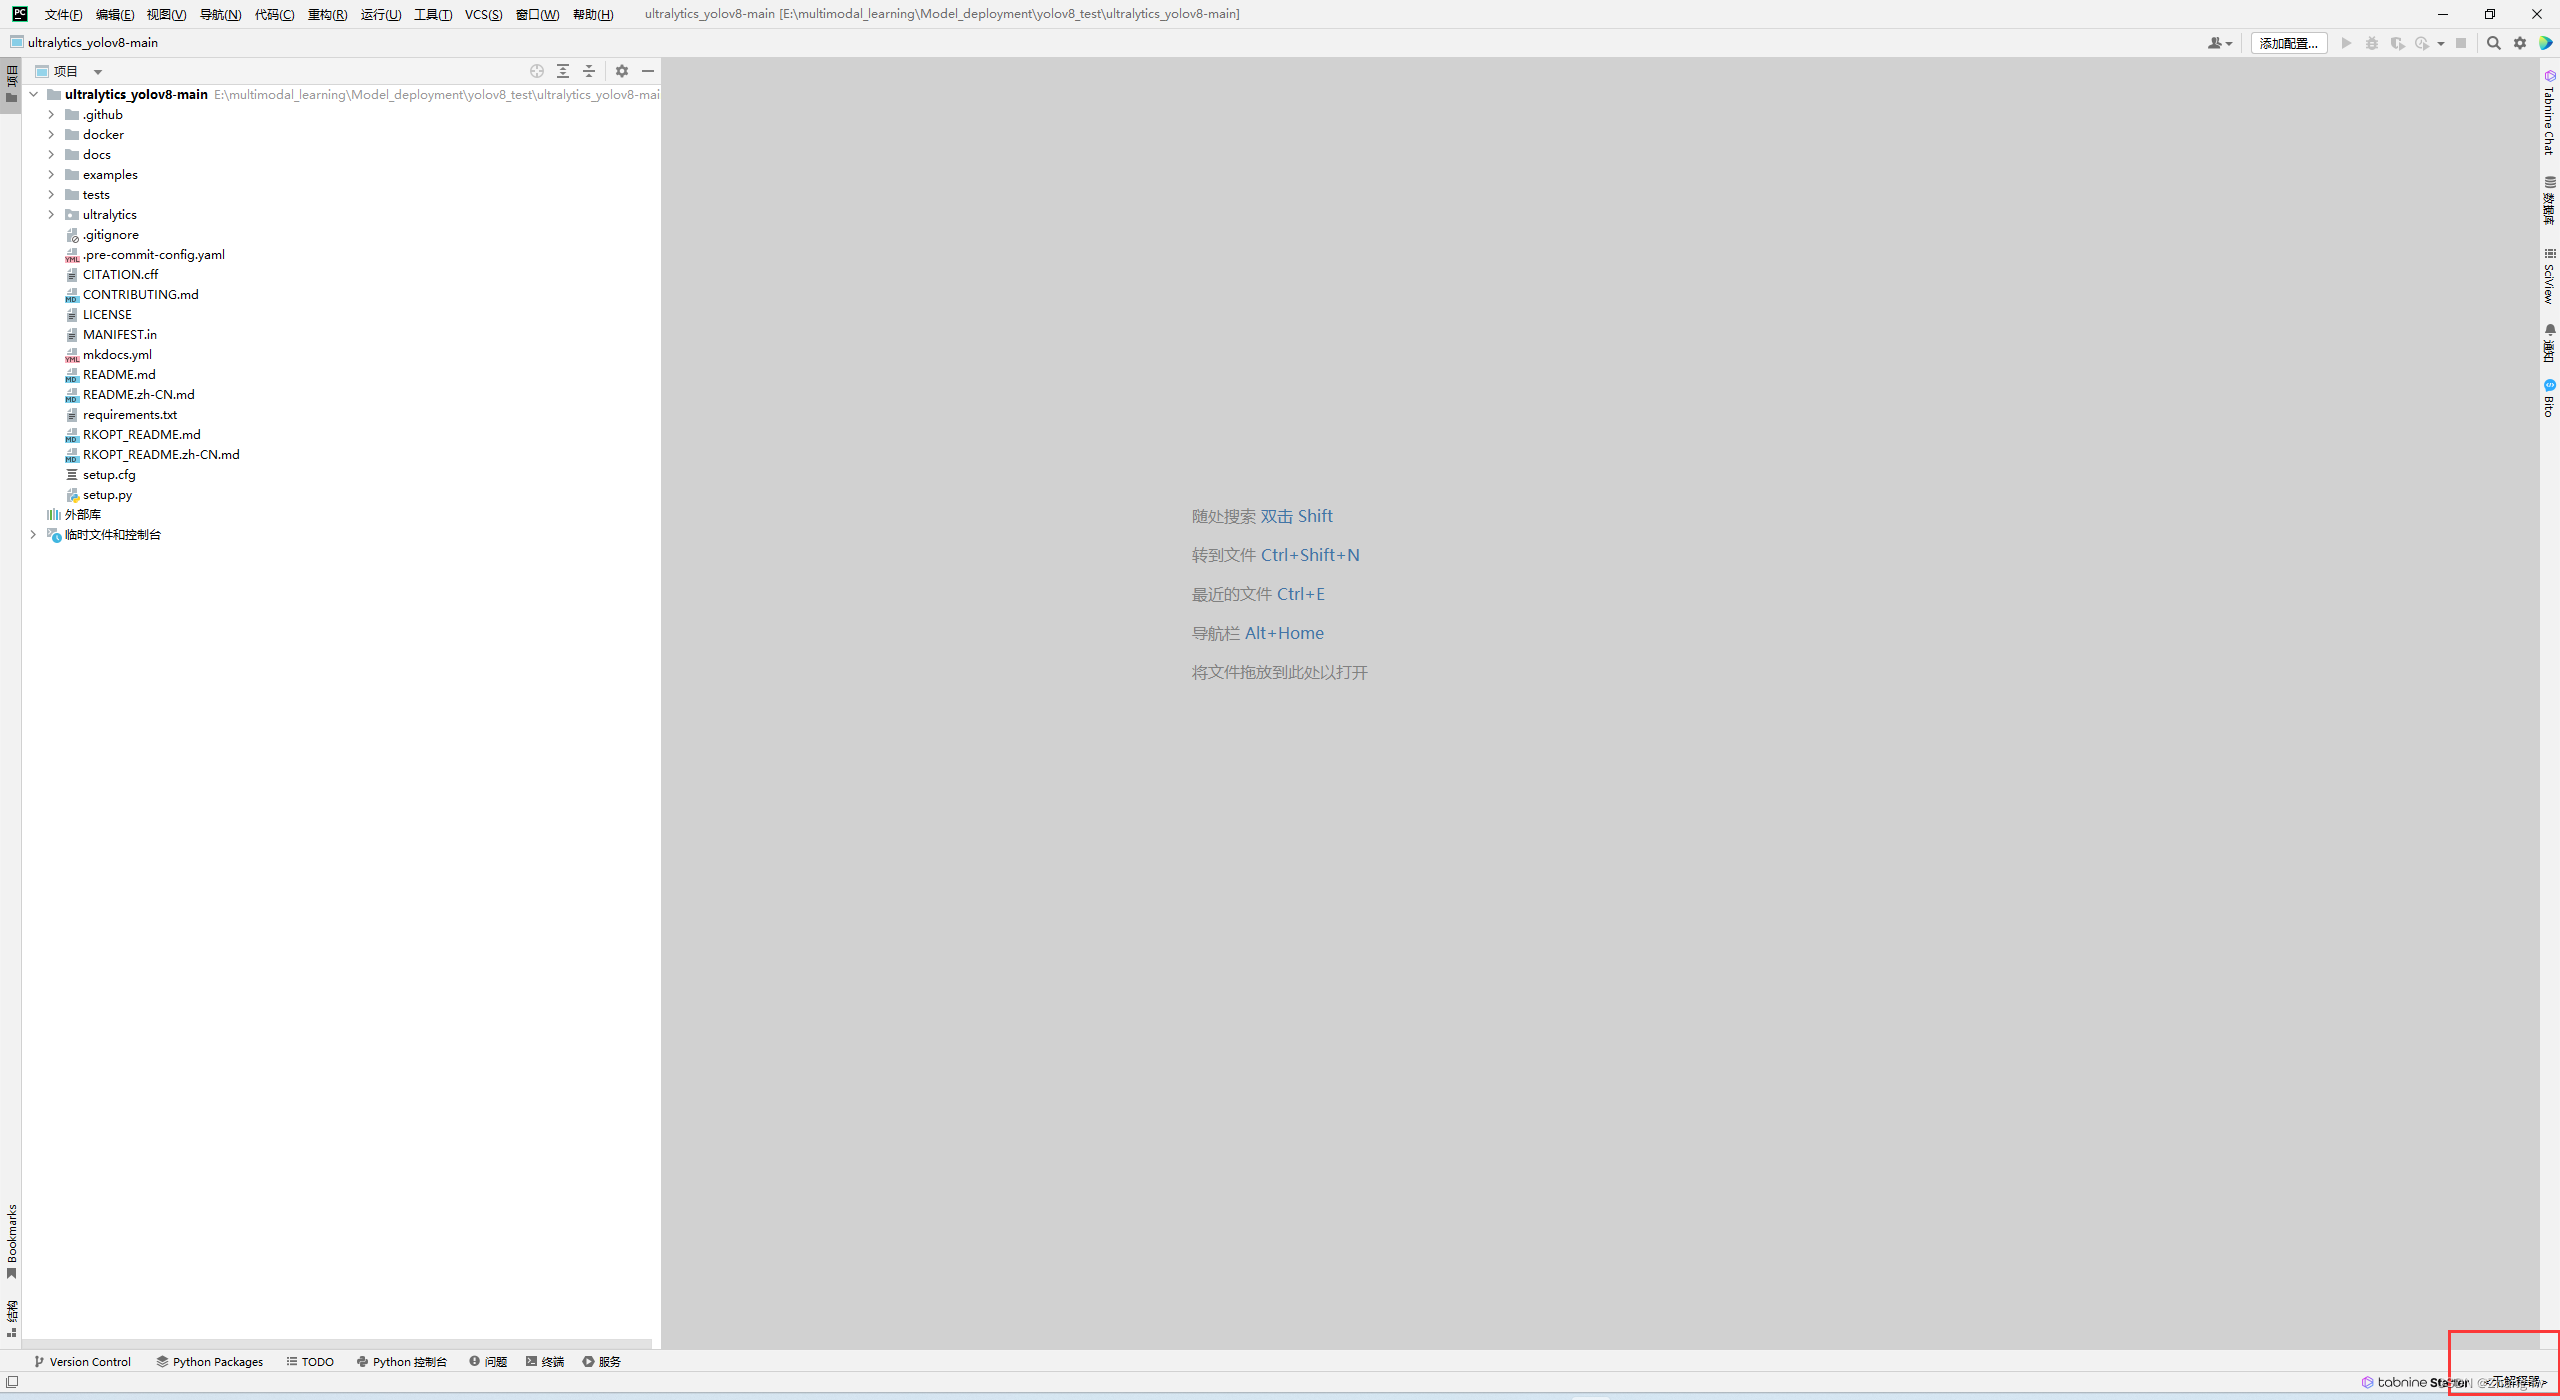
下载瑞星微提供的工程https://github.com/airockchip/ultralytics_yolov8.git,不要使用YOLO官方提供的,下载完成后解压
使用Pycharm打开刚才解压的工程文件如下所示,然后点击右下角选择添加解释器
找到自己Anaconda的位置,然后选择自己创建的环境的解释器。

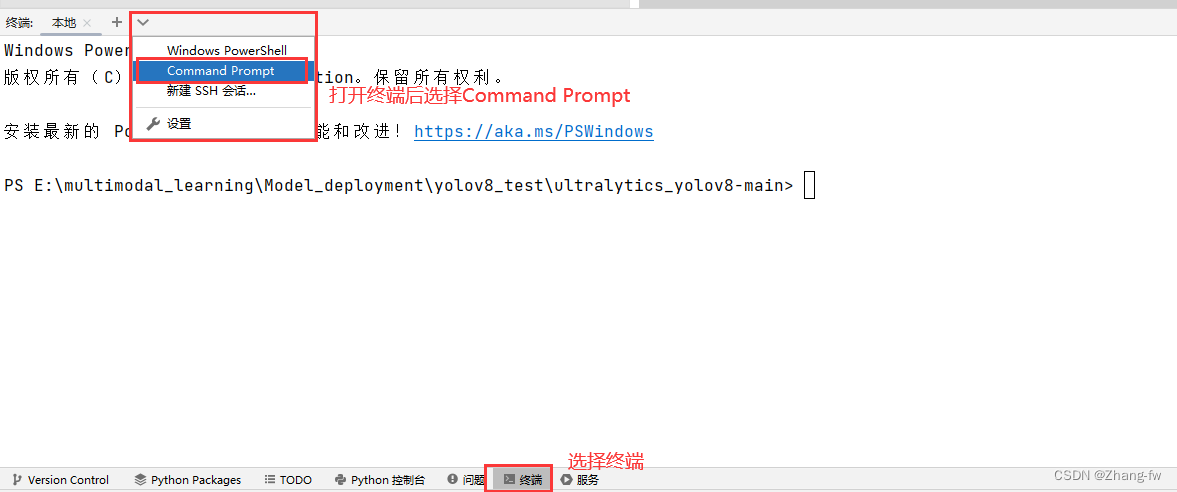
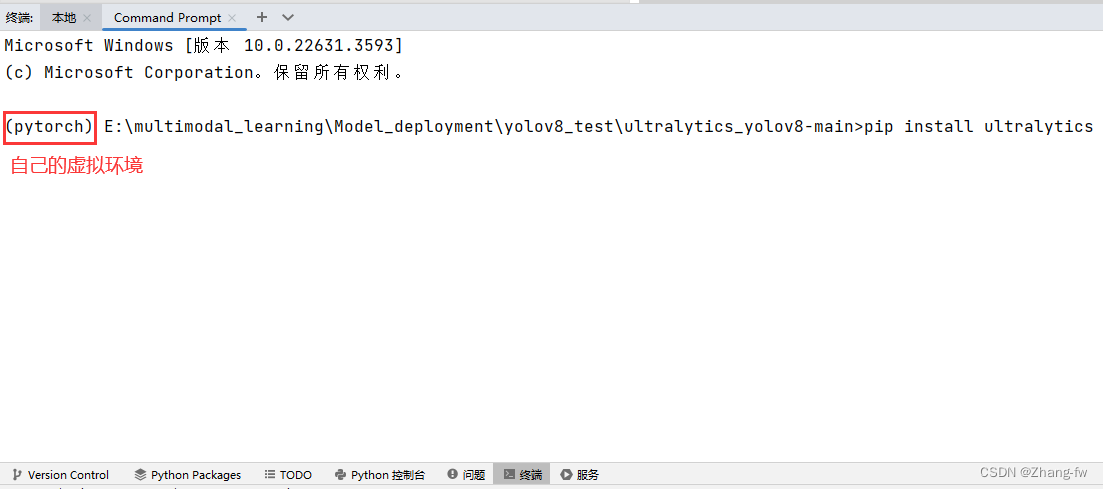
在下方点开终端选择Command Prompt就可以执行Anaconda prompt下的操作
使用下面的命令安装YOLOv8需要的依赖
pip install ultralytics
3.2 训练自己的数据集
3.2.1 数据集制作
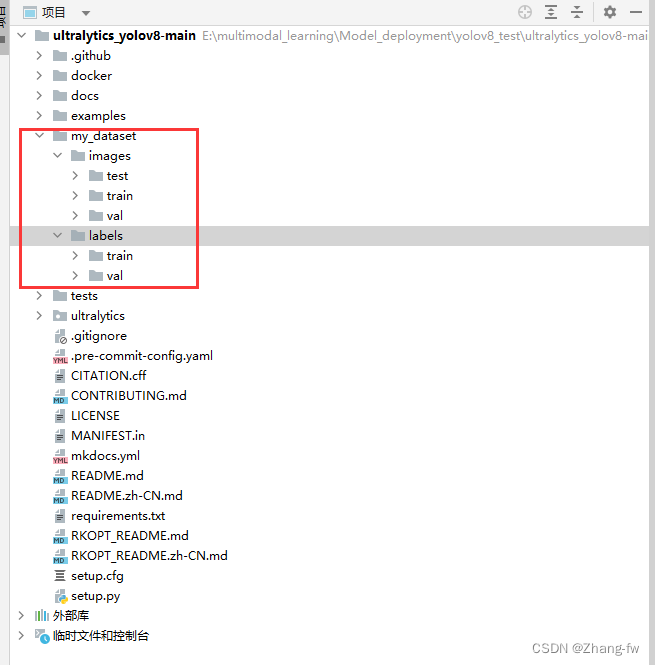
在工程下面新建一个my_dataset文件夹用来存放数据集的图片images和标签labels。train和va和test的比例通常为8:1:1
my_dataset
│
└───images
    │   train
    │   val
    │   test
│
└───labels
    │   train
    │   val
若有其他格式的标签可以网上找代码转换成YOLO格式的,也可以使用labelimg进行数据集进行标注
安装labelimg
pip install labelimg
在终端输入下面命令直接打开
labelimg


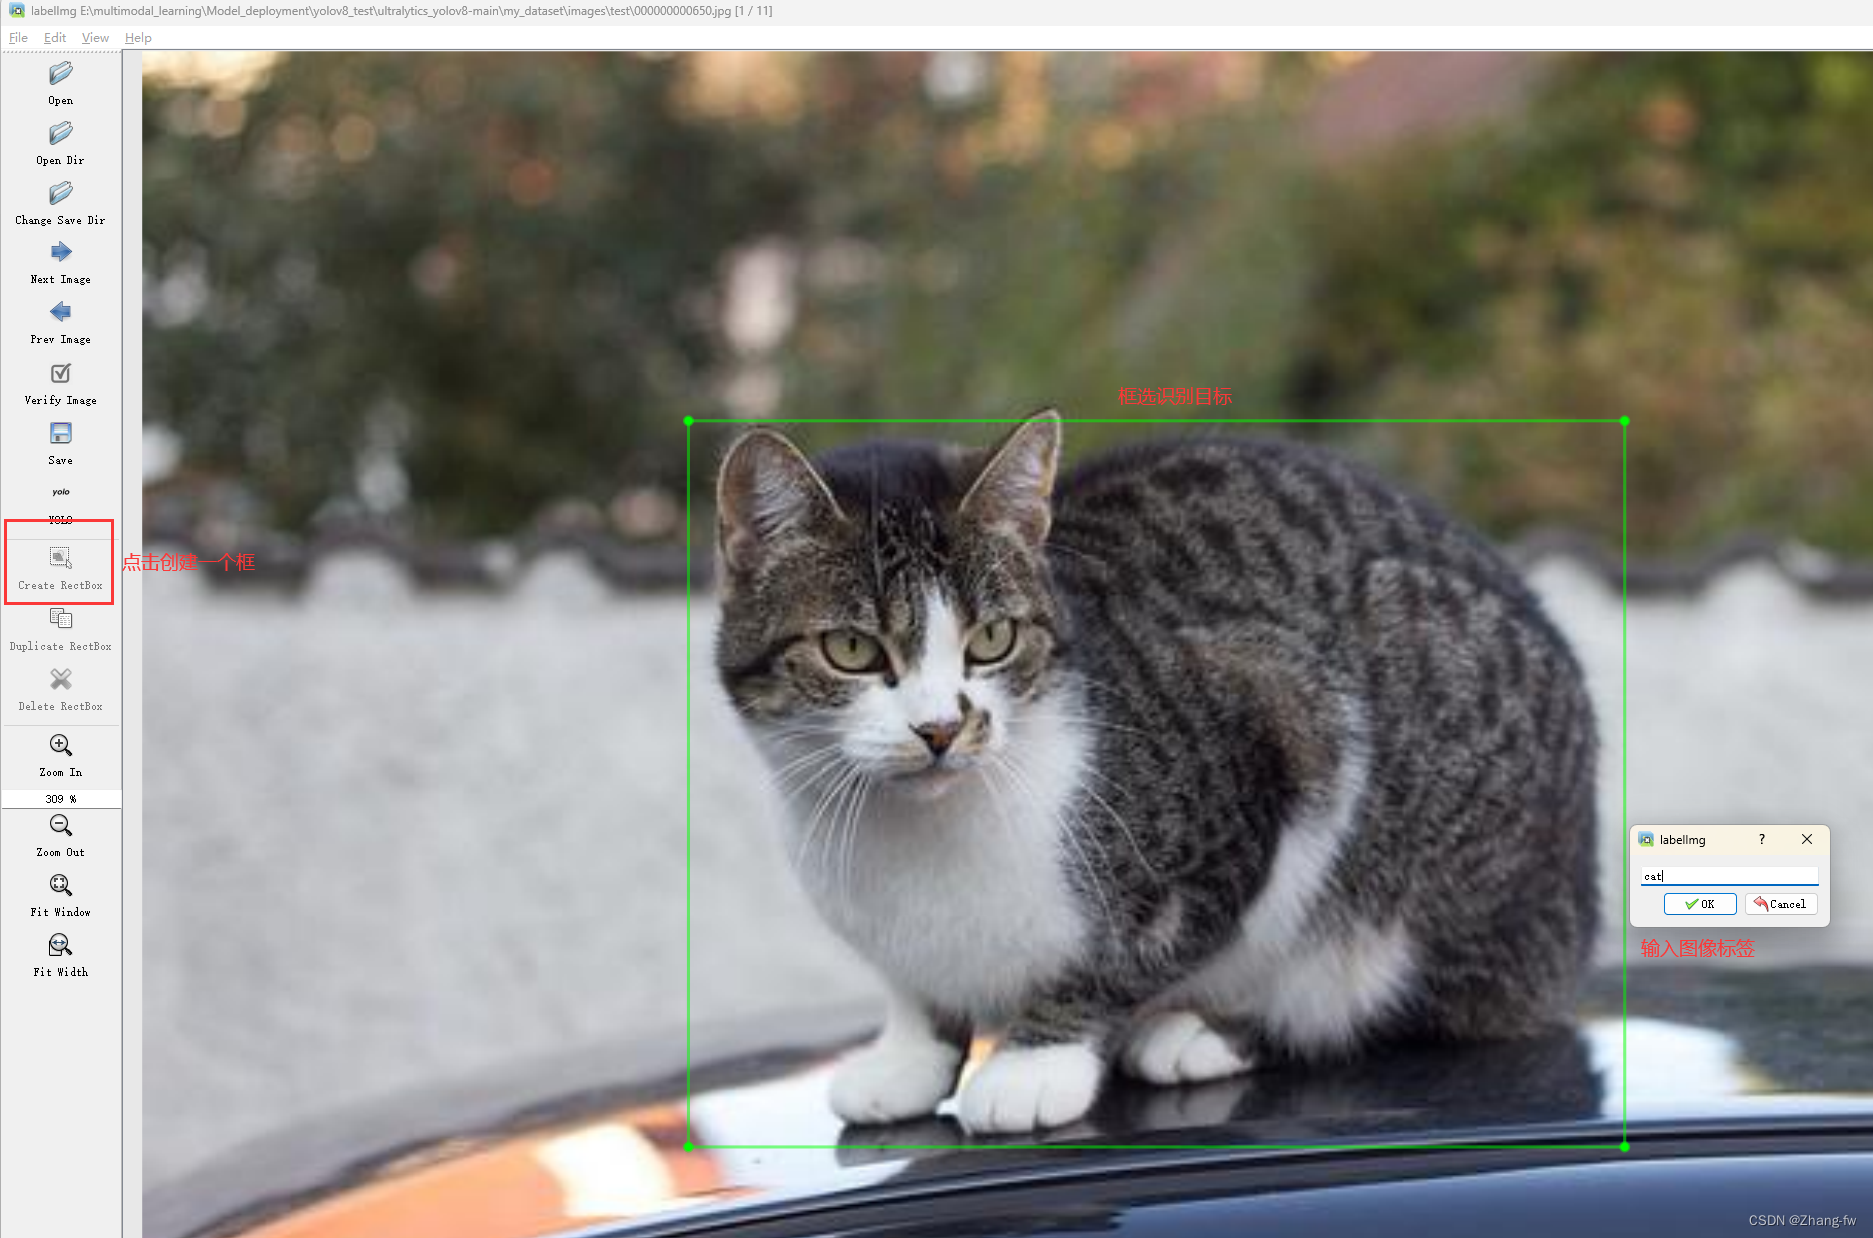
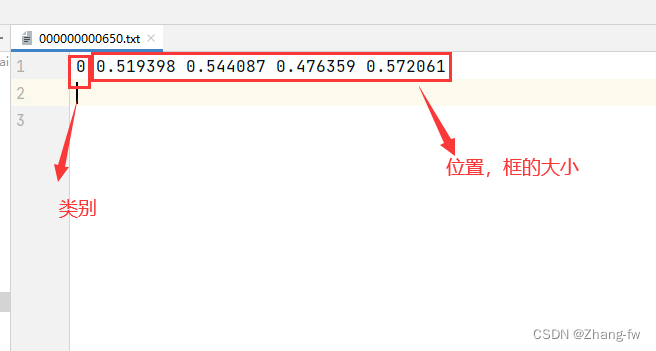
标记完成后可以打开标签文件查看
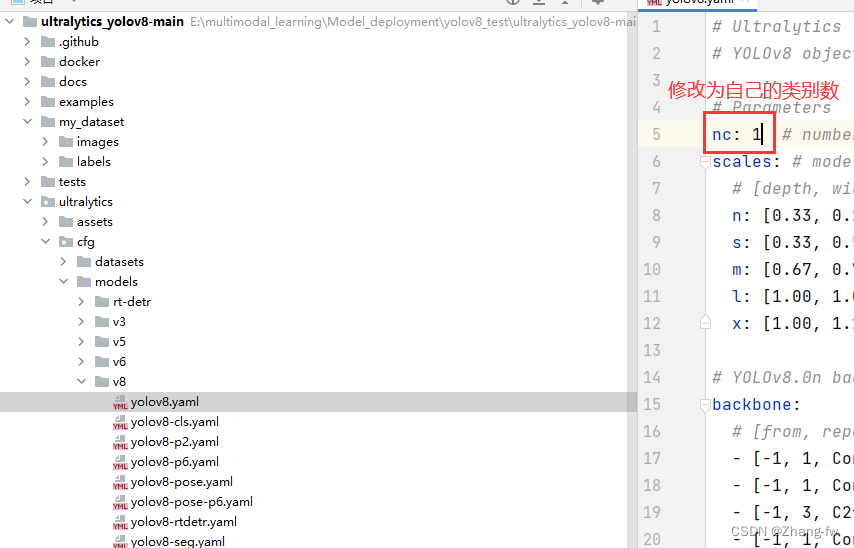
3.2.2 修改配置文件
修改ultralytics/cfg/models/v8/yolov8.yaml文件中的nc为自己的类别数
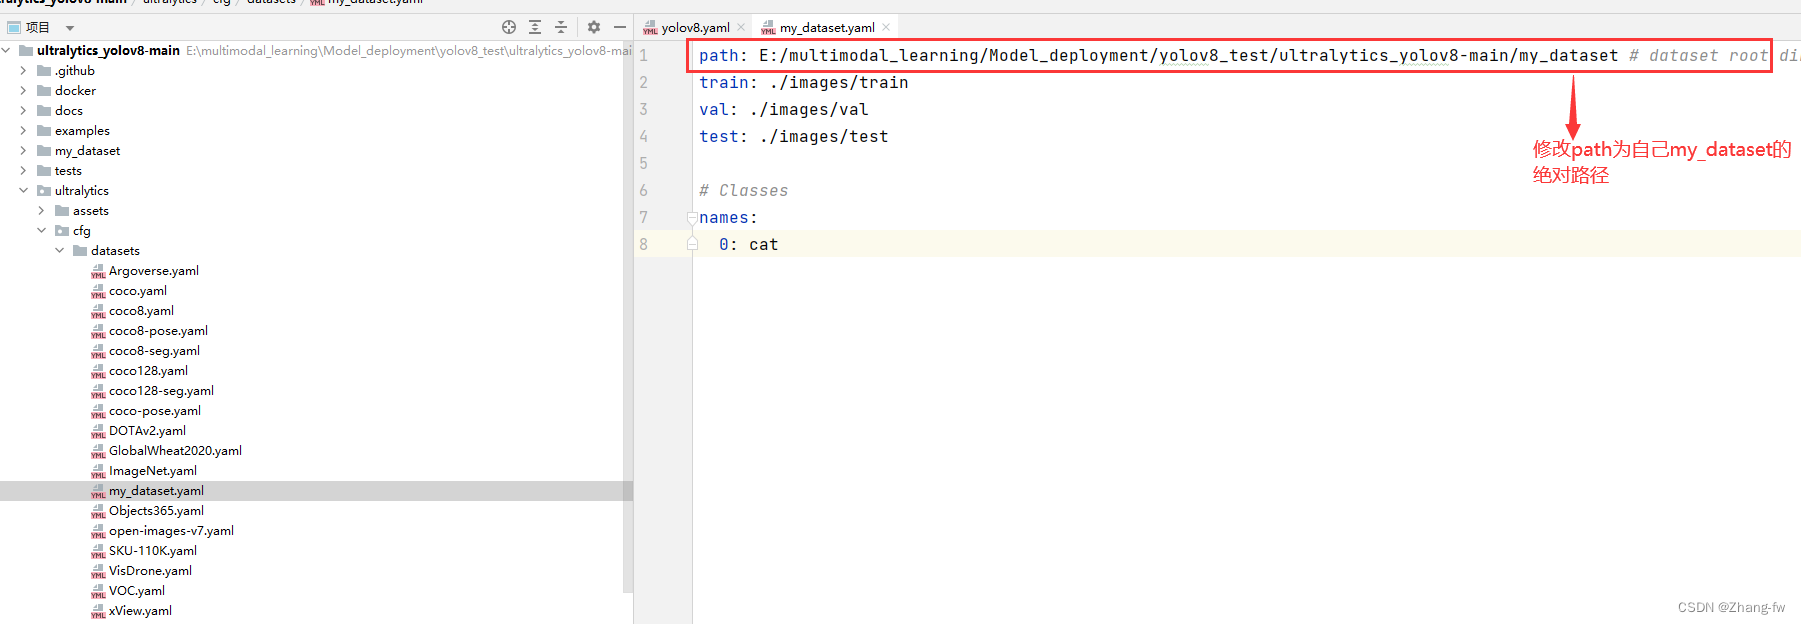
ultralytics_yolov8-main/ultralytics/cfg/datasets下新建my_dataset.yaml,与文件夹下其他yaml内容文件类似指明训练,验证的路径和自己类别的标签
path: E:/multimodal_learning/Model_deployment/yolov8_test/ultralytics_yolov8-main/my_dataset # dataset root dir
train: ./images/train
val: ./images/val
test: ./images/test

# Classes   修改为自己的标签
names:
  0: cat
3.2.3 开始训练
如果想要使用YOLO官网的预训练权重的可以在Detect - Ultralytics YOLO Docs 下载预训练权重,此处下载的是YOLOv8n的权重文件

在根目录下新建一个train.py使用下面的程序,并把下载的预训练权重文件移动过来,鼠标右键后点击训练
from ultralytics import YOLO

if __name__ == '__main__':
    model = YOLO('./ultralytics/cfg/models/v8/yolov8.yaml').load("./yolov8n.pt")#创建模型并加载预训练权重

    # Train the model
    model.train(epochs=100, batch=8 ,data='./ultralytics/cfg/datasets/my_dataset.yaml')
    #epochs表示训练的轮数,batch表示每次加载图片的数量,data是数据集的路径这里使用的是之前创建的yaml文件
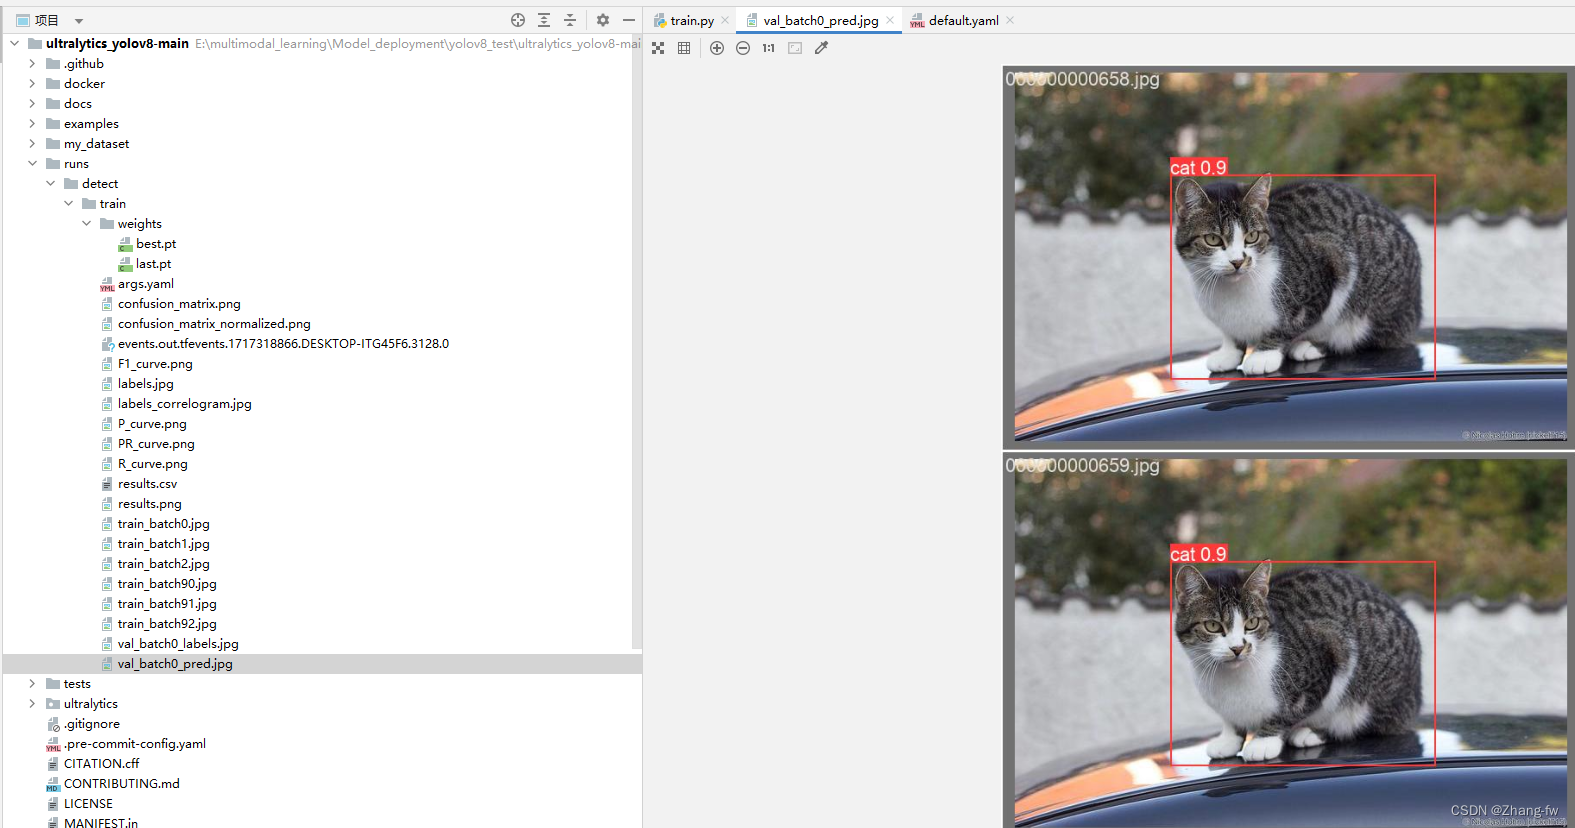
训练结束R结果保存在 runs\detect\train下面,可以点开验证图片进行查看,weights保存着best.pt是我们训练出来的最好的权重文件
可以新建一个predict.py来测试,加载自己训练的权重文件对测试图片进行预测,保存路径会打印出来
from ultralytics import YOLO

model = YOLO("./runs/detect/train/weights/best.pt")  # load a custom model

# Predict with the model
results = model("./my_dataset/images/test/000000000650.jpg",save=True)
3.3 导出onnx模型
新建一个py文件运行后会在 runs\detect\train\weights下生成best.onnx文件,
from ultralytics import YOLO

# Load a model
model = YOLO('./runs/detect/train/weights/best.pt')

# Export the model
model.export(format='rknn',opset=12)
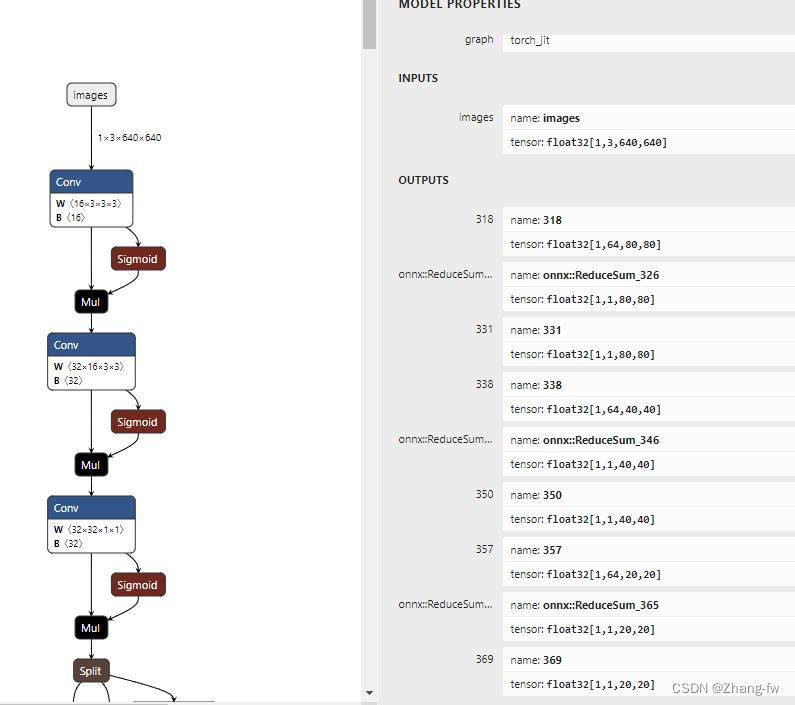
可以使用Netron来查看自己的模型,这里查看下导出的onnx文件。
四,模型转换
4.1 转换环境安装
把onnx模型转换成rknn模型需要一个linux环境的电脑,如果没有可以在电脑上安装虚拟机,这里使用一台Ubuntu环境的服务器。
在服务器中也需要安装Anaconda和Pycharm与前面2.1节和2.2节类似,这里不再赘述。
先创建一个rk3588的虚拟环境
conda create -n rk3588 python=3.9
进入rk3588环境
conda activate rk3588
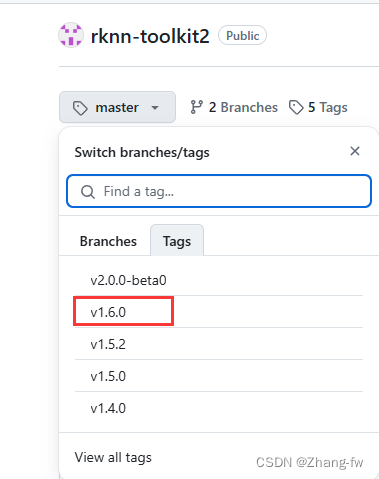
下载rknn-toolkit2https://github.com/airockchip/rknn-toolkit2.git我选择的1.6.0的版本
解压后进入rknn-toolkit2-1.6.0/rknn-toolkit2/packages/中

安装依赖
pip install -r requirements_cp39-1.6.0.txt -i https://mirror.baidu.com/pypi/simple
安装rknn_toolkit2
pip install rknn_toolkit2-1.6.0+81f21f4d-cp39-cp39-linux_x86_64.whl
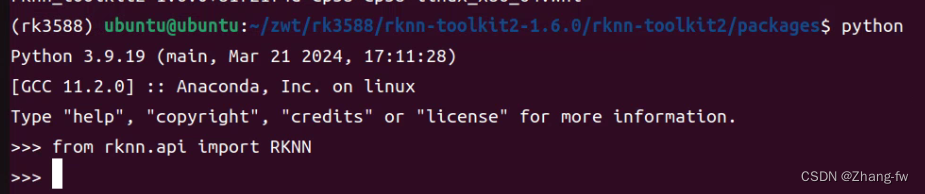
安装完成后进入python,使用下面命令没有报错,则安装成功。
from rknn.api import RKNN
4.2 转换成rknn模型
新建一个yolov8_test的文件夹来存放我们的文件
best.onnx是我们3.3导出的onnx模型,dataset下面放一张测试图片000000000650.jpg和dataset.txt,txt中写的是测试图片的名字。
dataset-1下面放的是我们要测试的图片,测试的结果会保存在dataset-2下。
.
├── best.onnx
├── dataset
│   ├── 000000000650.jpg
│   └── dataset.txt
├── dataset-1
│   └── 000000000650.jpg
├── dataset-2
└── inference_test-2.py
inference_test-2.py内容如下,包含模型转换和python部署的后处理
import os
import cv2
from rknn.api import RKNN
import numpy as np

IMG_FOLDER = "dataset-1"
RESULT_PATH = './dataset-2'

#修改为自己的类别
CLASSES = ['cat']

OBJ_THRESH = 0.45
NMS_THRESH = 0.45

MODEL_SIZE = (640, 640)

color_palette = np.random.uniform(0, 255, size=(len(CLASSES), 3))


def sigmoid(x):
    return 1 / (1 + np.exp(-x))


def letter_box(im, new_shape, pad_color=(0, 0, 0), info_need=False):
    # Resize and pad image while meeting stride-multiple constraints
    shape = im.shape[:2]  # current shape [height, width]
    if isinstance(new_shape, int):
        new_shape = (new_shape, new_shape)

    # Scale ratio
    r = min(new_shape[0] / shape[0], new_shape[1] / shape[1])

    # Compute padding
    ratio = r  # width, height ratios
    new_unpad = int(round(shape[1] * r)), int(round(shape[0] * r))
    dw, dh = new_shape[1] - new_unpad[0], new_shape[0] - new_unpad[1]  # wh padding

    dw /= 2  # divide padding into 2 sides
    dh /= 2

    if shape[::-1] != new_unpad:  # resize
        im = cv2.resize(im, new_unpad, interpolation=cv2.INTER_LINEAR)
    top, bottom = int(round(dh - 0.1)), int(round(dh + 0.1))
    left, right = int(round(dw - 0.1)), int(round(dw + 0.1))
    im = cv2.copyMakeBorder(im, top, bottom, left, right, cv2.BORDER_CONSTANT, value=pad_color)  # add border

    if info_need is True:
        return im, ratio, (dw, dh)
    else:
        return im


def filter_boxes(boxes, box_confidences, box_class_probs):
    """Filter boxes with object threshold.
    """
    box_confidences = box_confidences.reshape(-1)
    candidate, class_num = box_class_probs.shape

    class_max_score = np.max(box_class_probs, axis=-1)
    classes = np.argmax(box_class_probs, axis=-1)

    _class_pos = np.where(class_max_score * box_confidences >= OBJ_THRESH)
    scores = (class_max_score * box_confidences)[_class_pos]

    boxes = boxes[_class_pos]
    classes = classes[_class_pos]

    return boxes, classes, scores


def nms_boxes(boxes, scores):
    """Suppress non-maximal boxes.
    # Returns
        keep: ndarray, index of effective boxes.
    """
    x = boxes[:, 0]
    y = boxes[:, 1]
    w = boxes[:, 2] - boxes[:, 0]
    h = boxes[:, 3] - boxes[:, 1]

    areas = w * h
    order = scores.argsort()[::-1]

    keep = []
    while order.size > 0:
        i = order[0]
        keep.append(i)

        xx1 = np.maximum(x[i], x[order[1:]])
        yy1 = np.maximum(y[i], y[order[1:]])
        xx2 = np.minimum(x[i] + w[i], x[order[1:]] + w[order[1:]])
        yy2 = np.minimum(y[i] + h[i], y[order[1:]] + h[order[1:]])

        w1 = np.maximum(0.0, xx2 - xx1 + 0.00001)
        h1 = np.maximum(0.0, yy2 - yy1 + 0.00001)
        inter = w1 * h1

        ovr = inter / (areas[i] + areas[order[1:]] - inter)
        inds = np.where(ovr <= NMS_THRESH)[0]
        order = order[inds + 1]
    keep = np.array(keep)
    return keep


def softmax(x, axis=None):
    x = x - x.max(axis=axis, keepdims=True)
    y = np.exp(x)
    return y / y.sum(axis=axis, keepdims=True)


def dfl(position):
    # Distribution Focal Loss (DFL)
    n, c, h, w = position.shape
    p_num = 4
    mc = c // p_num
    y = position.reshape(n, p_num, mc, h, w)
    y = softmax(y, 2)
    acc_metrix = np.array(range(mc), dtype=float).reshape(1, 1, mc, 1, 1)
    y = (y * acc_metrix).sum(2)
    return y


def box_process(position):
    grid_h, grid_w = position.shape[2:4]
    col, row = np.meshgrid(np.arange(0, grid_w), np.arange(0, grid_h))
    col = col.reshape(1, 1, grid_h, grid_w)
    row = row.reshape(1, 1, grid_h, grid_w)
    grid = np.concatenate((col, row), axis=1)
    stride = np.array([MODEL_SIZE[1] // grid_h, MODEL_SIZE[0] // grid_w]).reshape(1, 2, 1, 1)

    position = dfl(position)
    box_xy = grid + 0.5 - position[:, 0:2, :, :]
    box_xy2 = grid + 0.5 + position[:, 2:4, :, :]
    xyxy = np.concatenate((box_xy * stride, box_xy2 * stride), axis=1)

    return xyxy


def post_process(input_data):
    boxes, scores, classes_conf = [], [], []
    defualt_branch = 3
    pair_per_branch = len(input_data) // defualt_branch
    # Python 忽略 score_sum 输出
    for i in range(defualt_branch):
        boxes.append(box_process(input_data[pair_per_branch * i]))
        classes_conf.append(input_data[pair_per_branch * i + 1])
        scores.append(np.ones_like(input_data[pair_per_branch * i + 1][:, :1, :, :], dtype=np.float32))

    def sp_flatten(_in):
        ch = _in.shape[1]
        _in = _in.transpose(0, 2, 3, 1)
        return _in.reshape(-1, ch)

    boxes = [sp_flatten(_v) for _v in boxes]
    classes_conf = [sp_flatten(_v) for _v in classes_conf]
    scores = [sp_flatten(_v) for _v in scores]

    boxes = np.concatenate(boxes)
    classes_conf = np.concatenate(classes_conf)
    scores = np.concatenate(scores)

    # filter according to threshold
    boxes, classes, scores = filter_boxes(boxes, scores, classes_conf)

    # nms
    nboxes, nclasses, nscores = [], [], []
    for c in set(classes):
        inds = np.where(classes == c)
        b = boxes[inds]
        c = classes[inds]
        s = scores[inds]
        keep = nms_boxes(b, s)

        if len(keep) != 0:
            nboxes.append(b[keep])
            nclasses.append(c[keep])
            nscores.append(s[keep])

    if not nclasses and not nscores:
        return None, None, None

    boxes = np.concatenate(nboxes)
    classes = np.concatenate(nclasses)
    scores = np.concatenate(nscores)

    return boxes, classes, scores


def draw_detections(img, left, top, right, bottom, score, class_id):
    """
    Draws bounding boxes and labels on the input image based on the detected objects.
    Args:
        img: The input image to draw detections on.
        box: Detected bounding box.
        score: Corresponding detection score.
        class_id: Class ID for the detected object.
    Returns:
        None
    """

    # Retrieve the color for the class ID
    color = color_palette[class_id]

    # Draw the bounding box on the image
    cv2.rectangle(img, (int(left), int(top)), (int(right), int(bottom)), color, 2)

    # Create the label text with class name and score
    label = f"{CLASSES[class_id]}: {score:.2f}"

    # Calculate the dimensions of the label text
    (label_width, label_height), _ = cv2.getTextSize(label, cv2.FONT_HERSHEY_SIMPLEX, 0.5, 1)

    # Calculate the position of the label text
    label_x = left
    label_y = top - 10 if top - 10 > label_height else top + 10

    # Draw a filled rectangle as the background for the label text
    cv2.rectangle(img, (label_x, label_y - label_height), (label_x + label_width, label_y + label_height), color,
                  cv2.FILLED)

    # Draw the label text on the image
    cv2.putText(img, label, (label_x, label_y), cv2.FONT_HERSHEY_SIMPLEX, 0.5, (0, 0, 0), 1, cv2.LINE_AA)


def draw(image, boxes, scores, classes):
    img_h, img_w = image.shape[:2]
    # Calculate scaling factors for bounding box coordinates
    x_factor = img_w / MODEL_SIZE[0]
    y_factor = img_h / MODEL_SIZE[1]

    for box, score, cl in zip(boxes, scores, classes):
        x1, y1, x2, y2 = [int(_b) for _b in box]

        left = int(x1 * x_factor)
        top = int(y1 * y_factor) - 10
        right = int(x2 * x_factor)
        bottom = int(y2 * y_factor) + 10

        print('class: {}, score: {}'.format(CLASSES[cl], score))
        print('box coordinate left,top,right,down: [{}, {}, {}, {}]'.format(left, top, right, bottom))

        # Retrieve the color for the class ID

        draw_detections(image, left, top, right, bottom, score, cl)

        # cv2.rectangle(image, (left, top), (right, bottom), color, 2)
        # cv2.putText(image, '{0} {1:.2f}'.format(CLASSES[cl], score),
        #             (left, top - 6),
        #             cv2.FONT_HERSHEY_SIMPLEX,
        #             0.6, (0, 0, 255), 2)


if __name__ == '__main__':

    # 确定目标设备
    target = 'RK3588'
    # 创建RKNN对象
    rknn = RKNN()

    # 配置RKNN模型
    print('--> config model')
    rknn.config(
        mean_values=[[0, 0, 0]],
        std_values=[[255, 255, 255]],
        target_platform=target,
    )
    print('done')

    # 加载 .onnx模型
    print('--> loading model')
    ret = rknn.load_onnx(model="./best.onnx")
    if ret != 0:
        print("load model failed!")
        rknn.release()
        exit(ret)
    print('done')

    # 构建RKNN模型
    print('--> building model')
    ret = rknn.build(do_quantization=True, dataset="./dataset/dataset.txt")
    if ret != 0:
        print("build model failed!")
        rknn.release()
        exit(ret)
    print('done')

    # 导出RKNN模型
    print('-->export RKNN model')
    ret = rknn.export_rknn('./yolov8.rknn')
    if ret != 0:
        print('export RKNN model failed')
        rknn.release()
        exit(ret)

    # 初始化 runtime 环境
    print('--> Init runtime environment')
    # run on RK356x/RK3588 with Debian OS, do not need specify target.
    #ret = rknn.init_runtime(target='rk3588', device_id='48c122b87375ccbc')
    # 如果使用电脑进行模拟测试
    ret = rknn.init_runtime()

    if ret != 0:
        print('Init runtime environment failed!')
        exit(ret)
    print('done')

    # 数据处理
    img_list = os.listdir(IMG_FOLDER)
    for i in range(len(img_list)):
        img_name = img_list[i]
        img_path = os.path.join(IMG_FOLDER, img_name)
        if not os.path.exists(img_path):
            print("{} is not found", img_name)
            continue
        img_src = cv2.imread(img_path)
        if img_src is None:
            print("文件不存在\n")


        # Due to rga init with (0,0,0), we using pad_color (0,0,0) instead of (114, 114, 114)
    pad_color = (0, 0, 0)
    img = letter_box(im=img_src.copy(), new_shape=(MODEL_SIZE[1], MODEL_SIZE[0]), pad_color=(0, 0, 0))
    # img = cv2.resize(img_src, (640, 512), interpolation=cv2.INTER_LINEAR) # direct resize
    input = np.expand_dims(img, axis=0)

    outputs = rknn.inference([input])

    boxes, classes, scores = post_process(outputs)

    img_p = img_src.copy()

    if boxes is not None:
        draw(img_p, boxes, scores, classes)

    # 保存结果
    if not os.path.exists(RESULT_PATH):
        os.mkdir(RESULT_PATH)

    result_path = os.path.join(RESULT_PATH, img_name)
    cv2.imwrite(result_path, img_p)
    print('Detection result save to {}'.format(result_path))

    pass

    rknn.release()
运行inference_test-2.py 文件,会在yolov8_test文件夹下生成yolov8.rknn,测试结果的图片保存在dataset-2文件夹下。
python inference_test-2.py
五,模型部署
5.1 香橙派(RK3588)环境安装
首先参考Orange Pi - Orangepi官网安装Ubuntu系统
然后打开时ssh服务,我这里使用的MobaXterm进行连接的
sudo apt-get install openssh-server
首先安装Miniconda — Anaconda documentation
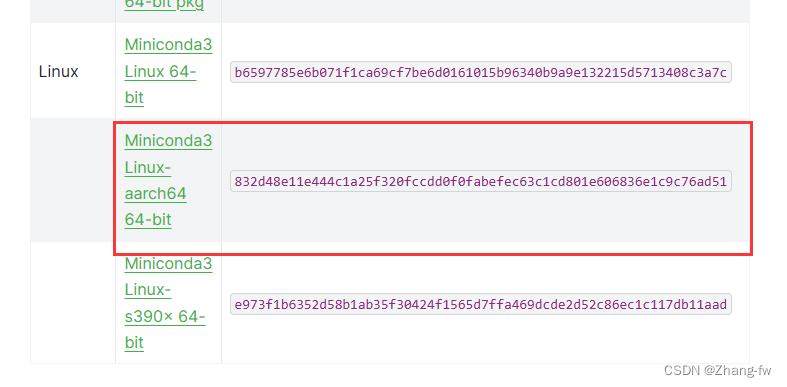
下载后使用命令来安装Miniconda3
./Miniconda3-latest-Linux-aarch64.sh
更新环境变量
source /home/topeet/.bashrc
创建环境
conda create -n rknn python=3.9
激活环境
conda activate rknn
安装rknn_toolkit_lite2
在4.1下载的rknn-toolkit2-1.6.0/rknn_toolkit_lite2/packages中有rknn_toolkit_lite2-1.6.0-cp39-cp39-linux_aarch64.whl,把它移动到开发板上然后使用下面的命令安装
pip install rknn_toolkit_lite2-1.6.0-cp39-cp39-linux_aarch64.whl -i https://pypi.mirrors.ustc.edu.cn/simple/
安装opencv
pip install opencv-python -i https://pypi.tuna.tsinghua.edu.cn/simple
5.2 python部署
在开发板上新建一个yolov8_test来存放文件,dataset-1是存放的测试图片,dataset-2是保存测试结果的位置,yolov8.rknn是我们的rknn模型,rk3588_test-2.py是我们的测试脚本
.
├── dataset-1
│   └── 000000000650.jpg
├── dataset-2
├── rk3588_test-2.py
└── yolov8.rknn
rk3588_test-2.py文件如下所示
import os
import cv2
from rknnlite.api import RKNNLite
import numpy as np

RKNN_MODEL = "./yolov8.rknn"
IMG_FOLDER = "dataset-1"
RESULT_PATH = './dataset-2'

CLASSES = ['car']

OBJ_THRESH = 0.45
NMS_THRESH = 0.45

MODEL_SIZE = (640, 640)

color_palette = np.random.uniform(0, 255, size=(len(CLASSES), 3))


def sigmoid(x):
    return 1 / (1 + np.exp(-x))


def letter_box(im, new_shape, pad_color=(0, 0, 0), info_need=False):
    # Resize and pad image while meeting stride-multiple constraints
    shape = im.shape[:2]  # current shape [height, width]
    if isinstance(new_shape, int):
        new_shape = (new_shape, new_shape)

    # Scale ratio
    r = min(new_shape[0] / shape[0], new_shape[1] / shape[1])

    # Compute padding
    ratio = r  # width, height ratios
    new_unpad = int(round(shape[1] * r)), int(round(shape[0] * r))
    dw, dh = new_shape[1] - new_unpad[0], new_shape[0] - new_unpad[1]  # wh padding

    dw /= 2  # divide padding into 2 sides
    dh /= 2

    if shape[::-1] != new_unpad:  # resize
        im = cv2.resize(im, new_unpad, interpolation=cv2.INTER_LINEAR)
    top, bottom = int(round(dh - 0.1)), int(round(dh + 0.1))
    left, right = int(round(dw - 0.1)), int(round(dw + 0.1))
    im = cv2.copyMakeBorder(im, top, bottom, left, right, cv2.BORDER_CONSTANT, value=pad_color)  # add border

    if info_need is True:
        return im, ratio, (dw, dh)
    else:
        return im


def filter_boxes(boxes, box_confidences, box_class_probs):
    """Filter boxes with object threshold.
    """
    box_confidences = box_confidences.reshape(-1)
    candidate, class_num = box_class_probs.shape

    class_max_score = np.max(box_class_probs, axis=-1)
    classes = np.argmax(box_class_probs, axis=-1)

    _class_pos = np.where(class_max_score * box_confidences >= OBJ_THRESH)
    scores = (class_max_score * box_confidences)[_class_pos]

    boxes = boxes[_class_pos]
    classes = classes[_class_pos]

    return boxes, classes, scores


def nms_boxes(boxes, scores):
    """Suppress non-maximal boxes.
    # Returns
        keep: ndarray, index of effective boxes.
    """
    x = boxes[:, 0]
    y = boxes[:, 1]
    w = boxes[:, 2] - boxes[:, 0]
    h = boxes[:, 3] - boxes[:, 1]

    areas = w * h
    order = scores.argsort()[::-1]

    keep = []
    while order.size > 0:
        i = order[0]
        keep.append(i)

        xx1 = np.maximum(x[i], x[order[1:]])
        yy1 = np.maximum(y[i], y[order[1:]])
        xx2 = np.minimum(x[i] + w[i], x[order[1:]] + w[order[1:]])
        yy2 = np.minimum(y[i] + h[i], y[order[1:]] + h[order[1:]])

        w1 = np.maximum(0.0, xx2 - xx1 + 0.00001)
        h1 = np.maximum(0.0, yy2 - yy1 + 0.00001)
        inter = w1 * h1

        ovr = inter / (areas[i] + areas[order[1:]] - inter)
        inds = np.where(ovr <= NMS_THRESH)[0]
        order = order[inds + 1]
    keep = np.array(keep)
    return keep


def softmax(x, axis=None):
    x = x - x.max(axis=axis, keepdims=True)
    y = np.exp(x)
    return y / y.sum(axis=axis, keepdims=True)


def dfl(position):
    # Distribution Focal Loss (DFL)
    n, c, h, w = position.shape
    p_num = 4
    mc = c // p_num
    y = position.reshape(n, p_num, mc, h, w)
    y = softmax(y, 2)
    acc_metrix = np.array(range(mc), dtype=float).reshape(1, 1, mc, 1, 1)
    y = (y * acc_metrix).sum(2)
    return y


def box_process(position):
    grid_h, grid_w = position.shape[2:4]
    col, row = np.meshgrid(np.arange(0, grid_w), np.arange(0, grid_h))
    col = col.reshape(1, 1, grid_h, grid_w)
    row = row.reshape(1, 1, grid_h, grid_w)
    grid = np.concatenate((col, row), axis=1)
    stride = np.array([MODEL_SIZE[1] // grid_h, MODEL_SIZE[0] // grid_w]).reshape(1, 2, 1, 1)

    position = dfl(position)
    box_xy = grid + 0.5 - position[:, 0:2, :, :]
    box_xy2 = grid + 0.5 + position[:, 2:4, :, :]
    xyxy = np.concatenate((box_xy * stride, box_xy2 * stride), axis=1)

    return xyxy


def post_process(input_data):
    boxes, scores, classes_conf = [], [], []
    defualt_branch = 3
    pair_per_branch = len(input_data) // defualt_branch
    # Python 忽略 score_sum 输出
    for i in range(defualt_branch):
        boxes.append(box_process(input_data[pair_per_branch * i]))
        classes_conf.append(input_data[pair_per_branch * i + 1])
        scores.append(np.ones_like(input_data[pair_per_branch * i + 1][:, :1, :, :], dtype=np.float32))

    def sp_flatten(_in):
        ch = _in.shape[1]
        _in = _in.transpose(0, 2, 3, 1)
        return _in.reshape(-1, ch)

    boxes = [sp_flatten(_v) for _v in boxes]
    classes_conf = [sp_flatten(_v) for _v in classes_conf]
    scores = [sp_flatten(_v) for _v in scores]

    boxes = np.concatenate(boxes)
    classes_conf = np.concatenate(classes_conf)
    scores = np.concatenate(scores)

    # filter according to threshold
    boxes, classes, scores = filter_boxes(boxes, scores, classes_conf)

    # nms
    nboxes, nclasses, nscores = [], [], []
    for c in set(classes):
        inds = np.where(classes == c)
        b = boxes[inds]
        c = classes[inds]
        s = scores[inds]
        keep = nms_boxes(b, s)

        if len(keep) != 0:
            nboxes.append(b[keep])
            nclasses.append(c[keep])
            nscores.append(s[keep])

    if not nclasses and not nscores:
        return None, None, None

    boxes = np.concatenate(nboxes)
    classes = np.concatenate(nclasses)
    scores = np.concatenate(nscores)

    return boxes, classes, scores


def draw_detections(img, left, top, right, bottom, score, class_id):
    """
    Draws bounding boxes and labels on the input image based on the detected objects.
    Args:
        img: The input image to draw detections on.
        box: Detected bounding box.
        score: Corresponding detection score.
        class_id: Class ID for the detected object.
    Returns:
        None
    """

    # Retrieve the color for the class ID
    color = color_palette[class_id]

    # Draw the bounding box on the image
    cv2.rectangle(img, (int(left), int(top)), (int(right), int(bottom)), color, 2)

    # Create the label text with class name and score
    label = f"{CLASSES[class_id]}: {score:.2f}"

    # Calculate the dimensions of the label text
    (label_width, label_height), _ = cv2.getTextSize(label, cv2.FONT_HERSHEY_SIMPLEX, 0.5, 1)

    # Calculate the position of the label text
    label_x = left
    label_y = top - 10 if top - 10 > label_height else top + 10

    # Draw a filled rectangle as the background for the label text
    cv2.rectangle(img, (label_x, label_y - label_height), (label_x + label_width, label_y + label_height), color,
                  cv2.FILLED)

    # Draw the label text on the image
    cv2.putText(img, label, (label_x, label_y), cv2.FONT_HERSHEY_SIMPLEX, 0.5, (0, 0, 0), 1, cv2.LINE_AA)


def draw(image, boxes, scores, classes):
    img_h, img_w = image.shape[:2]
    # Calculate scaling factors for bounding box coordinates
    x_factor = img_w / MODEL_SIZE[0]
    y_factor = img_h / MODEL_SIZE[1]

    for box, score, cl in zip(boxes, scores, classes):
        x1, y1, x2, y2 = [int(_b) for _b in box]

        left = int(x1 * x_factor)
        top = int(y1 * y_factor)
        right = int(x2 * x_factor)
        bottom = int(y2 * y_factor)

        print('class: {}, score: {}'.format(CLASSES[cl], score))
        print('box coordinate left,top,right,down: [{}, {}, {}, {}]'.format(left, top, right, bottom))

        # Retrieve the color for the class ID

        draw_detections(image, left, top, right, bottom, score, cl)

        # cv2.rectangle(image, (left, top), (right, bottom), color, 2)
        # cv2.putText(image, '{0} {1:.2f}'.format(CLASSES[cl], score),
        #             (left, top - 6),
        #             cv2.FONT_HERSHEY_SIMPLEX,
        #             0.6, (0, 0, 255), 2)


if __name__ == '__main__':

    # 创建RKNN对象
    rknn_lite = RKNNLite()

    # 加载RKNN模型
    print('--> Load RKNN model')
    ret = rknn_lite.load_rknn(RKNN_MODEL)
    if ret != 0:
        print('Load RKNN model failed')
        exit(ret)
    print('done')

    # 初始化 runtime 环境
    print('--> Init runtime environment')
    # run on RK356x/RK3588 with Debian OS, do not need specify target.
    ret = rknn_lite.init_runtime()
    if ret != 0:
        print('Init runtime environment failed!')
        exit(ret)
    print('done')

    # 数据处理
    img_list = os.listdir(IMG_FOLDER)
    for i in range(len(img_list)):
        img_name = img_list[i]
        img_path = os.path.join(IMG_FOLDER, img_name)
        if not os.path.exists(img_path):
            print("{} is not found", img_name)
            continue
        img_src = cv2.imread(img_path)
        if img_src is None:
            print("文件不存在\n")

        # Due to rga init with (0,0,0), we using pad_color (0,0,0) instead of (114, 114, 114)
        pad_color = (0, 0, 0)
        img = letter_box(im=img_src.copy(), new_shape=(MODEL_SIZE[1], MODEL_SIZE[0]), pad_color=(0, 0, 0))
        # img = cv2.resize(img_src, (640, 512), interpolation=cv2.INTER_LINEAR) # direct resize
        input = np.expand_dims(img, axis=0)

        outputs = rknn_lite.inference([input])

        boxes, classes, scores = post_process(outputs)

        img_p = img_src.copy()

        if boxes is not None:
            draw(img_p, boxes, scores, classes)

        # 保存结果
        if not os.path.exists(RESULT_PATH):
            os.mkdir(RESULT_PATH)

        result_path = os.path.join(RESULT_PATH, img_name)
        cv2.imwrite(result_path, img_p)
        print('Detection result save to {}'.format(result_path))

        pass

    # cv2.imshow("full post process result", img_p)

    rknn_lite.release()
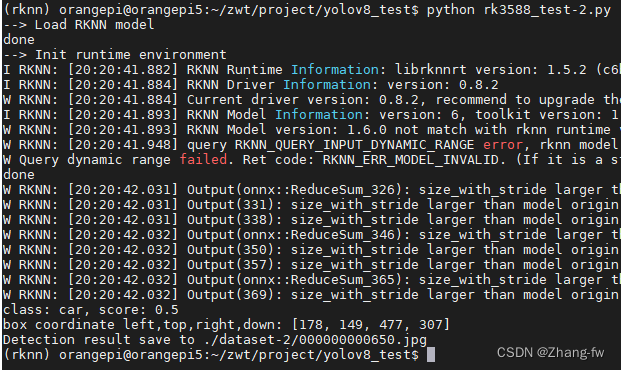
使用下面命令来执行
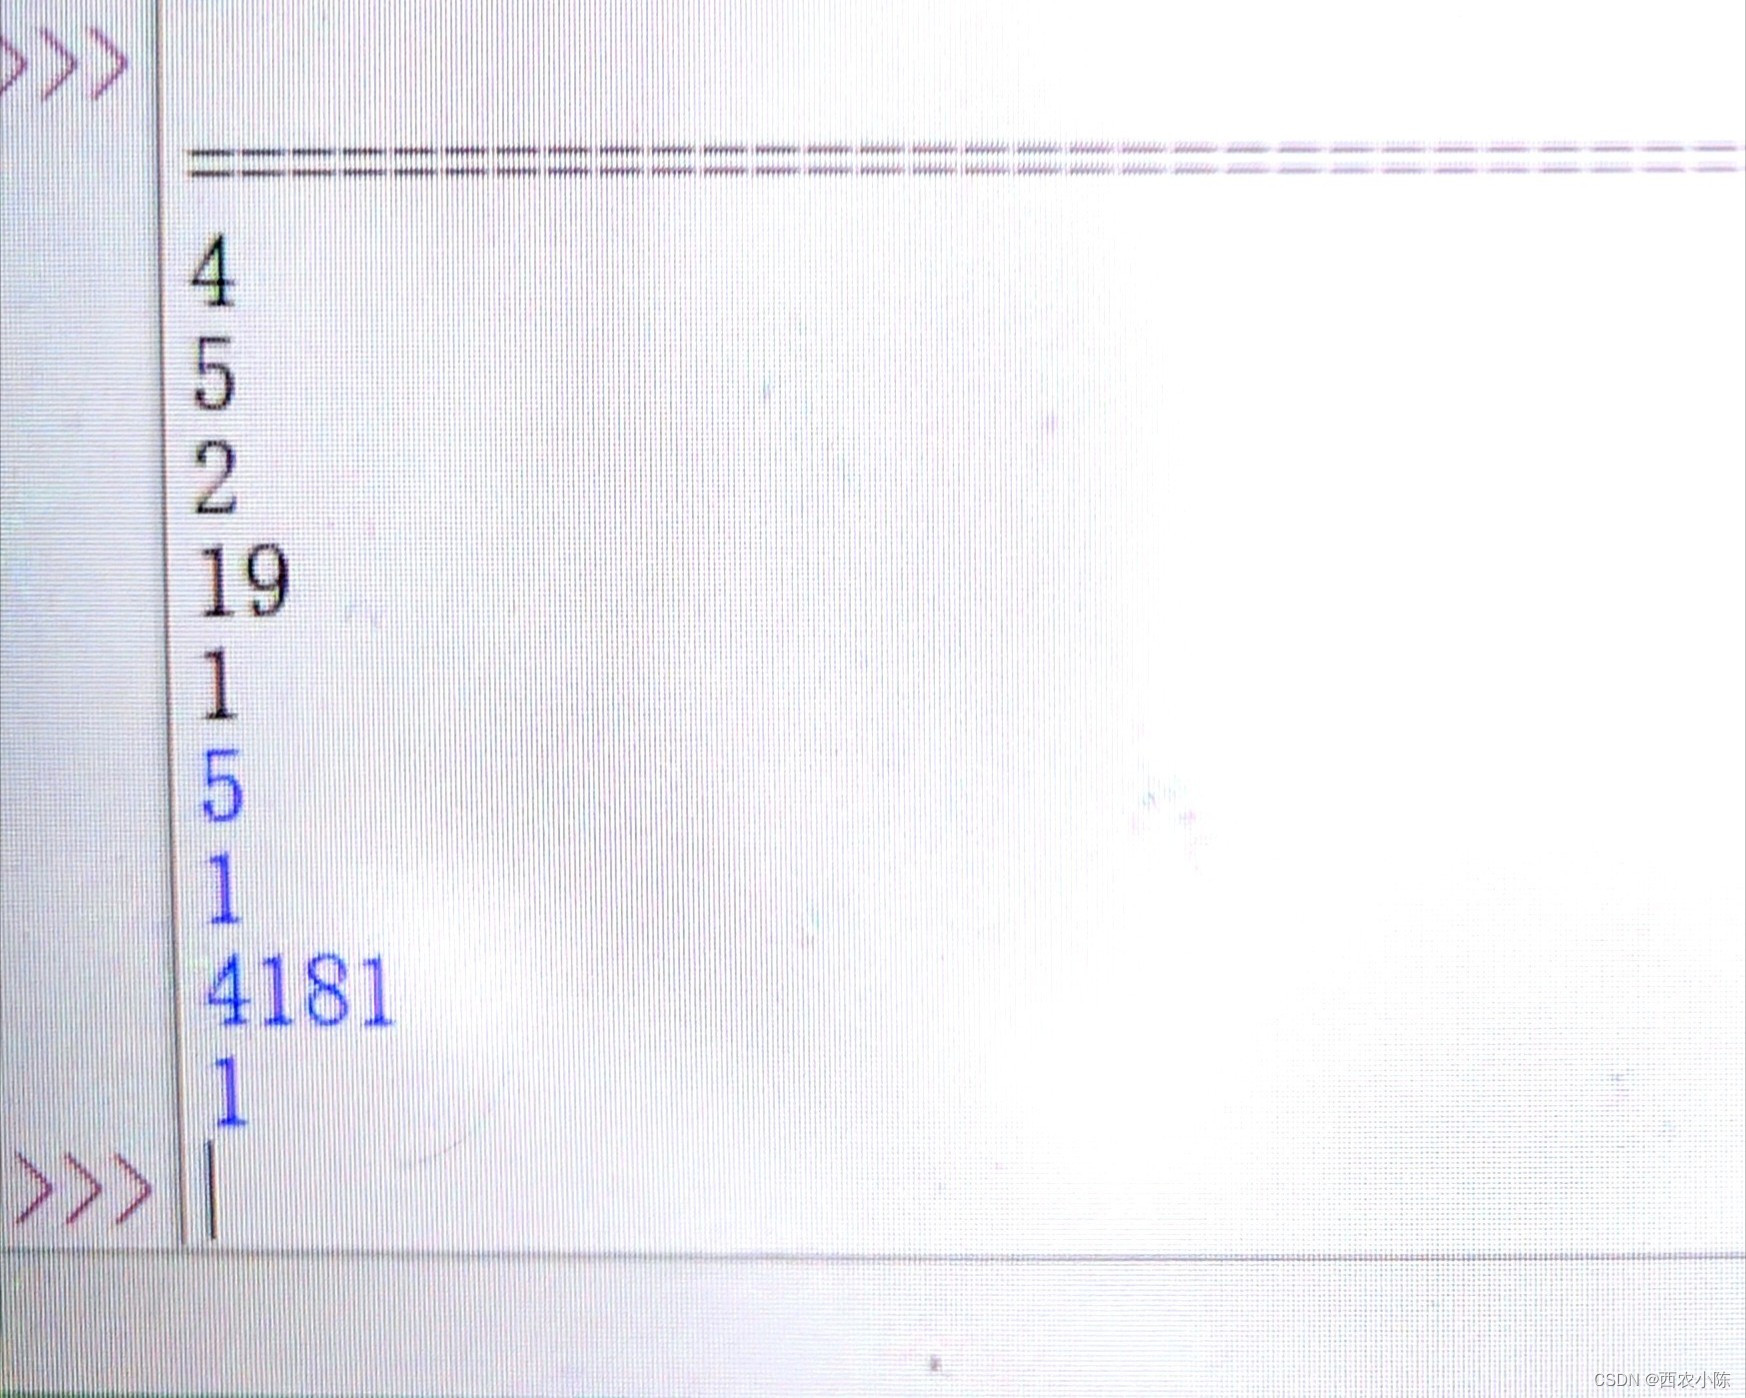
python rk3588_test-2.py
会输出检测的结果如下图所示
!